Fill এর ব্যবহার Edit Menu – Photoshop 42
ছবির মধ্যে অতিরিক্ত কিছু থাকলে তা তুলে দেওয়ার প্রয়োজন হয় । এখন কথা হচ্ছে, ছবিতে ছবির অতিরিক্ত কিছু মুছে দিবো কিভাবে ? আজকের আলোচনায় দেখাবো, ইমেজের বাড়তি কিছু কিভাবে মুছে ফেলা যায় । এই কাজগুলো করবো, মূলত Fill ও Stroke অপশন ব্যবহার করে । চলুন তাহলে নিচের অংশে ফিল এর ব্যবহার দেখে নেই ।
Fill অপশন এর ব্যবহার
ফিল অপশন ব্যবহার করবার জন্য প্রথমে আপনি আপনার কম্পিউটার থেকে ফটোশপ প্রোগ্রাম চালু করে নিন । ফটোশপ প্রোগ্রাম চালু করার পর ফটোশপ নতুন একটি ছবি ওপেন করুন । ঠিক নিচের ছবির মতো,

New Image Open
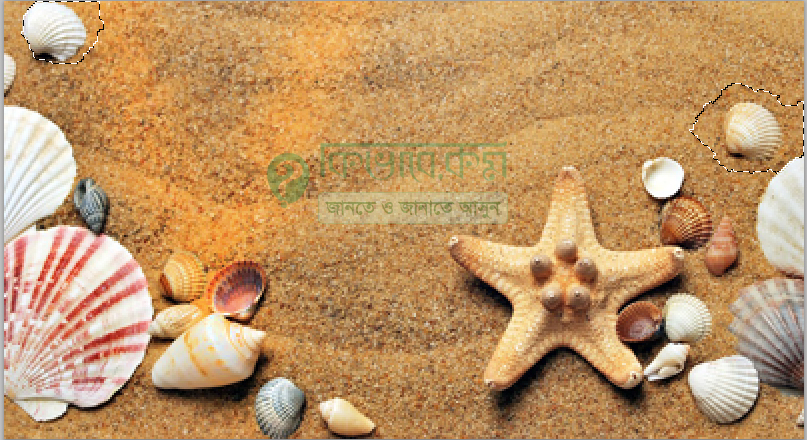
আপনার ক্ষেত্রে অন্য ছবিও ইউজ করতে পারেন । উপরের ছবিতে দেখুন, বেশ কিছু শামুক দেখা যাচ্ছে । এখন আপনি সেখান থেকে দুই একটি শামুক মুছে ফেলবো । সেটি করার জন্য কুইক সিলেকশন টুল বা ম্যাজিক ওয়ান্ড টুল সিলেক্ট করে উপরের ছবির শামুক সিলেকশন করে নিন । ঠিক নিচের ছবির মতো ।
Selection Cobi
উপরের ছবিতে ভালো ভাবে দেখুন । উপরের ছবির ডান পাশে এবং বাম পাশে সিলেকশন করে নিয়েছি দুটো আলাদা ঝিনুক , আপনি চাইলে একটা একটা করেও করতে পরেন ।
Click To Edit
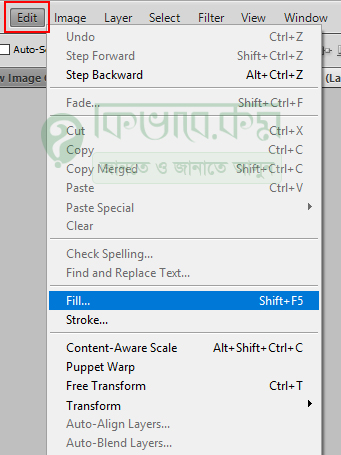
এবার ফটোশপ মেনু থেকে উপরের ছবির লাল মার্ক করা Edit মেনুতে ক্লিক করুন, ক্লিক করার পর নিচের দিকে সাব মেনু বের হবে । এরপর সেখান থেকে নীল কালার করা Fill লেখা অপশনে মাউস থেকে ক্লিক করে সিলেক্ট করুন । সিলেক্ট করার পর নিচের ছবির মতো উইন্ডো বের হবে । ভার্সন ভেদে একটু আলাদা ও থাকতে পারেন ।

Click To Fill
উপরের ছবিতে দেখুন । সেখানে লাল মার্ক করা Content-Aware লেখা অপশন আছে, সেটিতে ক্লিক করলে, সেখানে আরও কিছু অপশন বের হবে । যেমন, Pattern,Black, White, Color উপরের অংশ থেকে এই অপশনগুলো সিলেক্ট ব্যবহার করতে পারনে ।
যেহেতু আমরা উপরে ছবির মার্ক করা শামুক মুছে, তাই উপরের ছবির লাল মার্ক করা Content-Aware লেখা অপশন নির্বাচন করুন । আবার উপরের ছবির নিচের Normal লেখা অপশনে ক্লিক করে, বিভিন্ন ধরনের মুড নির্বাচন করে দিতে পারেন ।
Content-Aware সিলেক্ট অবস্থায় উপরের ছবির OK লেখা বাটনে ক্লিক করুন । দেখবেন, নিচের ছবির মতো দেখা যাবে ।

ঝিনুক মুছে গেছে
উপরের ছবিতে দেখুন । সেখানে লাল মার্ক করা অংশে ঝিনুক ছিলো , Fill করার পরে ঝিনুক নেই । সিলেকশন করা ছাড়া Fill অপশন কাজ করবে না ।
উপরের কাজটি আপনারা অন্য ভাবেও করতে পারেন ক্লোন স্ট্যাম্প টুল ব্যবহার করে ।