কিভাবে বুটেবল পেনড্রাইভ – Bootable USB করা যায়
সাধারনত বুটেবল সিডি/ডিভিডি দিয়ে আমরা কম্পিউটারে অপারেটিং সিস্টেম দিয়ে থাকি । তবে সিডি/ডিভিডি রোম কাজ না করলে কিংবা না থাকলে আমাদের তাকাতে হয় বুটেবল পেনড্রাইভ বা ইউএসবি ( USB = Universal Serial Bus ) ফ্ল্যাশ ড্রাইভ এর দিকে । তো চলুন আজ আমরা জানবো কিভাবে বুটেবল পেন ড্রাইভ করে ।
তবে তারও আগে জানা দরকার পেন ড্রাইভ বা ফ্ল্যাশ ড্রাইভ বুটেবল করে কিভাবে । চলুন জেনে নেই কিভাবে বুটেবল পেনড্রাইভ বা ফ্ল্যাশ ড্রাইভ করা যায় ।
বুটেবল পেনড্রাইভ বা ফ্ল্যাশ ড্রাইভ করা :
প্রথমে জেনে নেয়া যাক আপনার কি কি লাগবে ।
- কমপক্ষে 4 GB জায়গা সহ একটি USB পেন ড্রাইভ বা ফ্ল্যাশ ড্রাইভ, 8 GB হলে ভালো হয় ।
- Windows OS এর ISO ফাইল । নেট থেকে নামিয়ে নিতে পারেন অথবা দেখে নিতে পারেন ISO ফাইল কি এবং OS এর ISO ইমেজ কিভাবে করে ।
- একটি Windows OS Installed PC
- এবং Windows 7 USB/DVD Download tool নামে একটি ছোট্ট সফ্টওয়ার যেটি ডাউনলোড করে নিতে পারেন https://www.microsoft.com/en-us/download/confirmation.aspx?id=56485 থেকে
এই একটি টুল দিয়েই আপনি Windows 7 , Windows 8 কিংবা Windows 10 install দিতে পারবেন । তো আর দেরি কেনো, চলুন শুরু করা যাক ।
Windows 7 USB/DVD Download tool সফ্টওয়ারটি নামিয়ে নিয়ে ইন্সটল দেবার পর সেটিকে রান করলে নিচের মতো দেখাবে ।
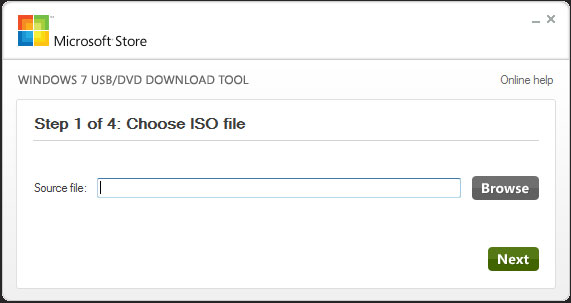
Bootable USB Installer Open
এবার এখান থেকে Source File এর Browse বাটনে ক্লিক করুন । এর পর দেখিয়ে দিন কোথায় আপনার অপারেটিং সিস্টেমের ISO File টি আছে । যেমন আমি আমার ক্ষেত্রে D ড্রাইভের ভিতর থেকে win7.iso ফাইলটি নি্র্বাচন করেছি ।
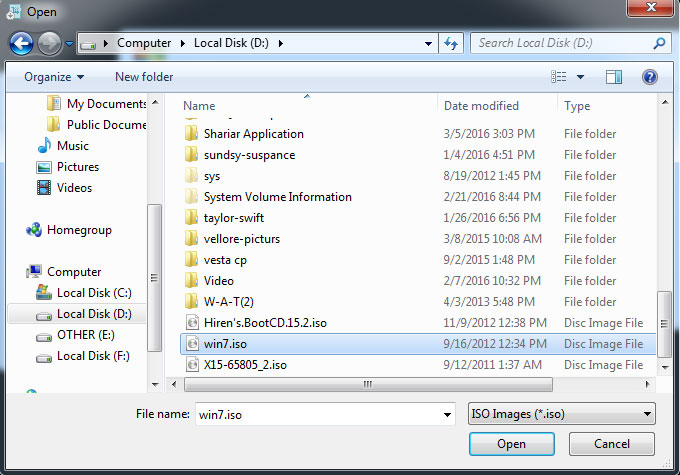
Browse Windows OS File
উইনডোজ ওএস ফাইল দেখিয়ে দেয়া হলে Next বাটনে ক্লিক করুন এবং নিচের মতো আর একটি পার্ট আসবে ।
choose usb device
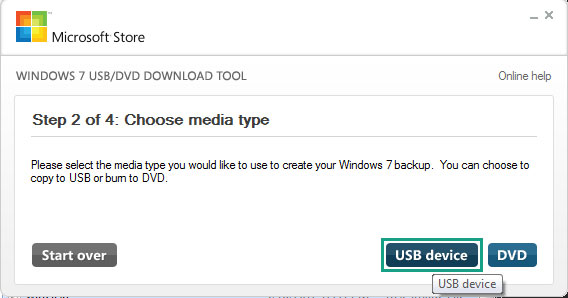
এখানে আপনাকে ঠিক করে দিতে হবে আপনি USB Drive এ নাকি DVD কে বুটেবল বানাবেন । আমাদের ক্ষেত্রে আমরা ক্লিক করবো USB Drive এ । এর ঠিক পরেই আসবে নিচেম মতো আর একটি পার্ট ।
choose usb and began copy
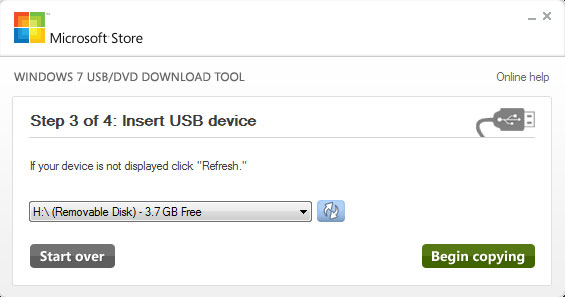
এই যায়গাতে আপনাকে ঠিক করে দিতে হবে আপনি কোন USB Drive কে বুটেবল করবেন যদি একাধিক পেনড্রাইভ লাগানো থাকে । আর যদি কোন পেন ড্রাইভ লাগানো না থাকে, তো লাগিয়ে নিন এবং যেখান থেকে পেনড্রাইভ ঠিক করে দেবার কথা তার ডান পাশের রিফ্রেশ আইকন এ ক্লিক করুন । ফ্ল্যাশ ড্রাইভ নির্বাচন করা হয়ে গেলে Begin Copying এ ক্লিক করুন ।
নোট: যদি আপনার পিসিতে ( যেটি দিয়ে বুটেবল পেন ড্রাইভ বানাচ্ছেন ) কোন এন্টিভাইরাস থাকে তো সেটিকে Disable করে দিন Begin Copying এ ক্লিক করার আগেই । তা না হলে আপনার এন্টিভাইরাস পেন ড্রাইভ এ কপি হওয়া সদ্য autorun.ini ফাইল টিকে ডিলিক করে দিতে পারে ।
Begin Copying এ ক্লিক করার পর আপনার পেন ড্রাইভ ফরম্যাট দিতে চাইবে । Yes এ ক্লিক করুন ।
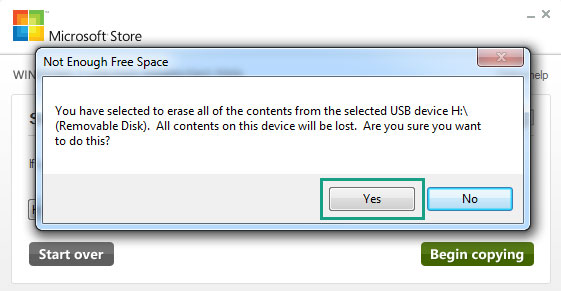
give access to format the usb
ফরম্যটিং শেষ হয় গেলে নিজে থেকেই ফাইক কপি করা শুরু করবে এবং বেশ কিছুটা সময় পর ফাইল কপি করা শেষ হয়ে গেছে Finish দেখাবে । হয়ে গেছে আপনার বুটেবল পেনড্রাইভ । এবার এটিকে আপনি যে পিসি তে অপারেটিং সিস্টেম দিতে চাচ্ছেন আর USB Port এ লাগিয়ে (মেশিন অফ থাকা অবস্থায় ভালো হয়, তা না হলে পেন ড্রাইভের ফাইলগুলো নষ্ট হয়ে যেতে পারে ) কম্পিউটার অন করুন এবং বায়স থেকে দেখিয়ে দিয়ে অপারেটিং সিস্টেম ইন্সটল শুরু করুন।