Firefox ব্রাউজারে VPN ব্যবহার করবো কিভাবে
VPN এর ফুল ফর্ম হচ্ছে, Virtual Private Network। ভিপিএন ব্যবহার করে আপনি যেকোন দেশের লোকেশন ব্যবহার করতে পারেন। কিছু কিছু ওয়েব সাইট আছে, সেগুলোতে নির্দিষ্ট দেশের আইপি ছাড়া ভিজিট করতে দেয় না, সেক্ষেত্রে আমরা ভিপিএন ইউজ করে যেকোন ওয়েব সাইটে প্রর্দশন করতে পারি। তো চলুন নিচের অংশে দেখে নেই।
Firefox ব্রাউজারে ভিপিএন ব্যবহার করার জন্য আমরা ফায়ার ফক্স ব্রাউজারে ছোট একটি এক্সটেনশন যোগ করবো, যার নাম Browsec VPN । এর আগের আলোচনায় আমরা দেখিয়েছি, কিভাবে ক্রম ব্রাউজার এবং Opera ব্রাউজারে ফ্রি ভিপিএন ইউজ করা যায়। আজকে তারই আলোকে দেখাবো কিভাবে Firefox ব্রাউজারে ফ্রি VPN ব্যবহার করা যায়।
ফায়ার ফক্স ব্রাউজারে এক্সটেনশন অ্যাড করার নিয়ম
Firefox ব্রাউজারে এক্সটেনশন অ্যাড করার জন্য প্রথমে আপনি আপনার ডিভাইস থেকে ফায়ারফক্স ব্রাউজার ওপেন করুন। ফায়ারফক্স ব্রাউজার ওপেন করার পর এড্রেস বারে গিয়ে addons.mozilla.org লিখে Enter প্রেস করুন। এন্টার প্রেস করার পর নিচের দিকে নতুন পেজ ওপেন হবে।
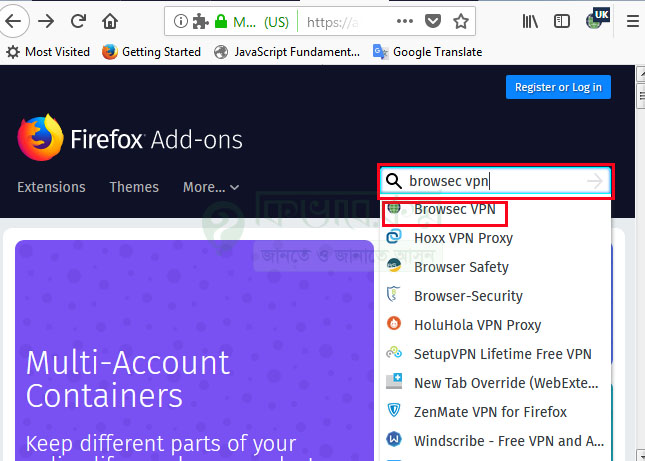
browsec vpn
উপরের ছবিটিতে দেখুন। উপরের ছবিটির ডান পাশে উপরের দিকে লাল মার্ক করা ঘর দেখা যাচ্ছে, সেখানে browsec VPN লিখে সার্চ করলে নিচের দিকে বেশ কিছু VPN এর লিস্ট দেখা যাবে। এবার সেখান থেকে লাল মার্ক করা লেখা browsec VPN অপশনে ক্লিক করুন। ক্লিক করার পর নিচের ছবিটির মতো পেজ চলে আসবে।
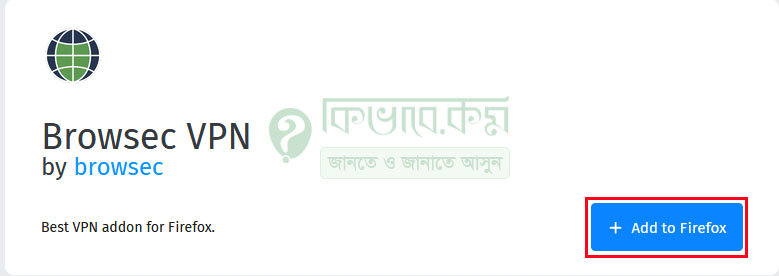
vpn add to firefox
এরপর উপরের ছবিটির লাল মার্ক করার মতো + Add to Firefox লেখা বাটন দেখা যাবে, সেখানে ক্লিক করুন। ক্লিক করার পর ফাইলটি ডাউনলোড শুরু হবে। ডাউনলোড শেষ হওয়ার পর ব্রাউজারের উপরের দিকে নিচের ছবিটির মতো পেজ ওপেন হবে।
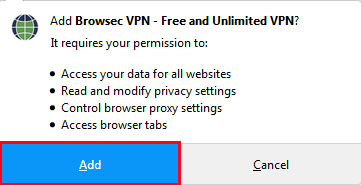
clcik to add
এখন সেখান থেকে উপরের ছবিটির লাল মার্ক করা Add লেখা বাটনে ক্লিক করুন। ক্লিক করার পর Firefox ব্রাউজারে এক্সটেনশনটি অ্যাড হয়ে যাবে।
Firefox browser এ ভিপিএন কানেক্ট করার নিয়ম
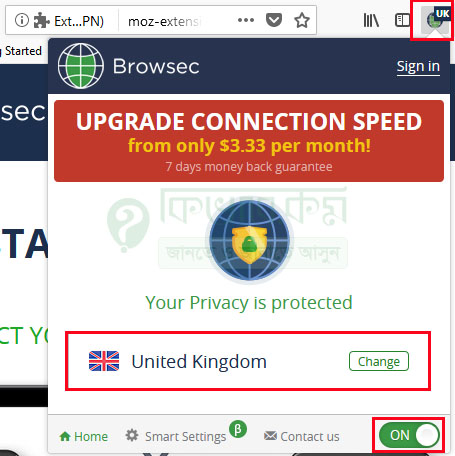
vpn
browsec vpn ফায়ারফক্স ব্রাউজারে অ্যাড করার পর ভিপিএনকে কানেক্ট করার Firefox ব্রাউজার ডান পাশে গোল একটি আইকন দেখা যাবে, ঠিক উপরের ছবিটির উপরের লাল মার্ক করার মতো। এবার সেখানে ক্লিক করুন। ক্লিক করার পর নিচের দিকে অপশন দেখা যাবে। এবার উপরের ছবিটির লাল মার্ক করা United Kingdom লেখা দেখা যাচ্ছে। আমি আমার ক্ষেত্রে আগে থেকেই লোকেশন সিলেক্ট করে রেখেছি।
আপনি কোন দেশের লোকেশন সিলেক্ট করবেন তা নির্ধারন করুন। যেহেতু এই ফ্রি তাই বেশ কয়েকটা দেশের লোকেশন ব্যবহার করতে পারবেন।ha