Free Transform ফটোশপে লেয়ার ঘুরিয়ে নেয়া – Photoshop 53
Free Transform বা মুক্ত ভাবে অবস্থান পরিবর্তন । ছবির লেয়ার গুলোর আকার পরিবর্তন কিংবা ঘুরিয়ে নেবার প্রয়োজন পড়লে আমরা ফটোশপে Free Transform করে থাকি । তো চলুন দেয়ে নেয়া যাক কিভাবে ফ্রি ট্রান্সফরমেশন এর মাধ্যমে ফটোশপে লেয়ার ঘুরিয়ে নেয়া যায় ।
ফটোশপে লেয়ার ঘুরিয়ে নেয়া
যা বলছিলাম, প্রতিটি লেয়ার কে ঘুরিয়ে নেবার জন্য ফটোপশে প্রথামে যে লেয়ার টি ট্রান্সফর্ম করাতে চান, সেটি সিলেক্ট করে নিন । এর পর দেখে নিন যে মুভ টুল সিলেক্ট আছে কিনা টুলবার এ । এবার কিবোর্ড থেকে চাপুন Ctrl + T, ফটোশপে Free Transform এর কবোর্ড কমান্ড ।
Note : যে কোন ইমেজ ফটোশপে ওপেন করলে ( অথবা নতুন কোন ফটোশপ ডকুমেন্ট তৈরি করলে সেটির ব্যকগ্রাউন্ড ) বাই ডিফণ্ট সেটি সেই লেয়ার টি লক করা থাকে । সেটিকে আগে আনলক করে নিন, নিচের ছবিতে দেখুন ।
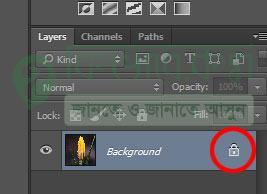
Unlock Layer
যে লেয়ার টি লক থাকে, তার ডান পাশে একটি তালা থাকে, সেটিতে ক্লিক করলে আনলক হয়ে যাবে লেয়ার টি ।
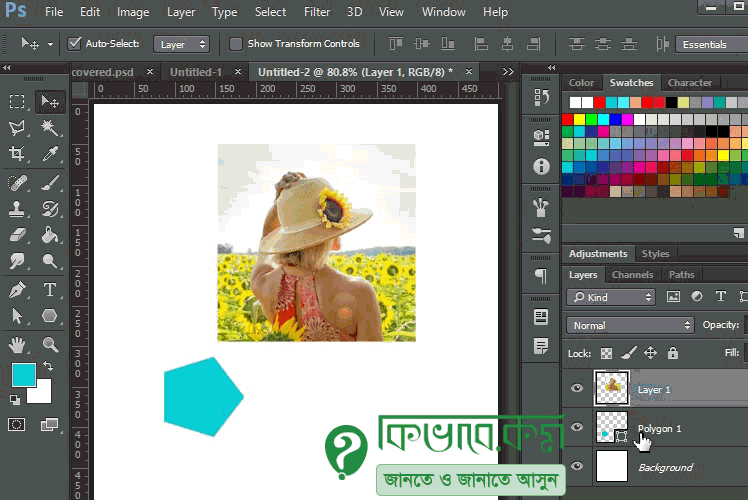
তো যা বলছিলাম, Free Transform একটিভ করার পর দেখবেন যে লেয়ার অবজেক্ট টির চারিধারে কিছু বিন্দু এসেছে । এবার সেই বিন্দু গুলোতে ক্লিক করে ড্রাগ করে অপজেক্ট টির আকার পরিবর্তন কিংবা ঘুরাতে পারবেন । নিচের এনিমেটেড ছবিটি দেখুন ।
Free Transform in Photoshop
দেখতেই পাচ্ছেন উপরের ছবিতে আমরা লেয়ার অবজেক্ট গুলোর আকার পরিবর্তন করতে পারছি সহজেই । আর ঘোরানোর জন্য কোনাগুলোর একটু নিচে মাউচ নিলে দেখবেন দুই দিকে এরো দেখাচ্ছে একটু বাকা হয়ে । ক্লিক করে উপরে কিংবা নিচে ঘরালেই হয়ে যাবে ।
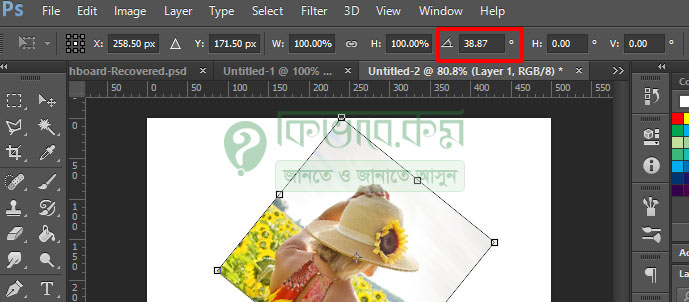
Rotate layer object in Photoshop
Note : Free Transform করার সময় কোনার বিন্দু গুলো ধরে সরালে ভালো হয় । আর অবজেক্ট এর রেশিও ঠিক রাখার জন্য কোনার বিন্দু তে ক্লিক করার পর পর ই কিবোর্ড এ Alt + Shift কি চেপে ধরে ড্রাগ করবেন ।
ফটোশপ Free Transform এর আরো বেশ কিছু Advance ব্যবহার আছে, যা পরের টিউটোরিয়াল এ নিয়ে আসছি আমরা । চোখ রাখুন 
উপরে বলেছিলাম ফটোশপে Free Transform এর কবোর্ড কমান্ড হলো Ctrl + T. চাইলে মেনু থেকেও ফ্রি ট্রান্সফর্ম একটিভ করে নিতে পরেন । সেটি করবার জন্য ফটোশপ মেনু থেকে Edit লেখা মেনুতে ক্লিক করুন , ক্লিক করার পর নিচের ছবির মতো অপশন বের হবে ।
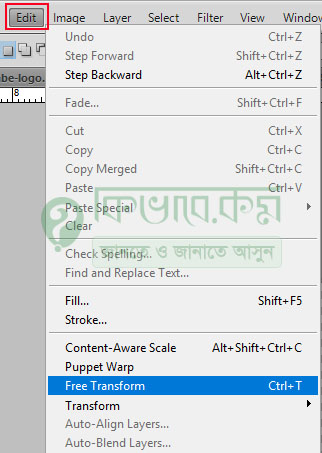
Select Free Transform
পেয়ে যাবেন ফটোশপে Free Transform.